
 Deutsch
 Tiếng Việt
 日本語
日本語 한국어
한국어 ไทย
ไทย Português
 العربية
 Français
 Español
 Italiano
 Nederlands
 Svenska
 Norsk
Norsk Dansk
Dansk Polski
 Русский
 Türkçe
 Bahasa Indonesia
 Bahasa Melayu
How to Install a Car Amplifier: Step-by-Step Guide for Beginners
Upgrading your car’s audio system with a new amplifier can dramatically improve sound quality, but knowing how to install a car amplifier correctly is key to avoiding damage and getting the best performance. Whether you're a beginner or looking to refine your skills, this guide will walk you through the process safely and efficiently.
Why Install a Car Amplifier?
Installing a car amplifier is one of the most effective ways to enhance your vehicle's audio system. Unlike factory stereos, which often lack power and clarity, a dedicated amplifier delivers cleaner, stronger sound to your speakers or subwoofers. This upgrade is especially valuable if you're adding aftermarket components or seeking deeper bass and higher volume without distortion.
Beyond improved sound quality, a properly installed car amplifier can extend the lifespan of your speakers. By providing consistent power, it prevents strain on your head unit and ensures optimal performance. Whether you're a casual listener or an audiophile, learning how to install a car amplifier is a worthwhile skill that pays off in audio quality and system reliability.
Tools and Materials You’ll Need
Before you begin, gather the essential tools and materials to ensure a smooth installation. Having everything on hand will save time and prevent frustration mid-project. Here’s what you’ll need:
- Car amplifier – Choose one that matches your system’s power requirements.
- Amplifier wiring kit – Includes power cable, ground wire, RCA cables, and remote turn-on wire.
- Wire strippers and crimpers – For preparing and securing connections.
- Screwdrivers and wrenches – To secure the amplifier and access panels.
- Multimeter – For testing voltage and connections.
- Electrical tape or heat shrink tubing – To insulate and protect wires.
- Fuse holder and fuse – Critical for safety near the battery.
- Zip ties or wire loom – For organizing and securing cables.
For premium options, brands like Alchimist offer high-quality wiring kits and amplifiers designed for durability and performance. Their products are engineered in Germany to meet exacting standards, ensuring a reliable installation.
Pre-Installation Preparation
Proper preparation is key to a successful amplifier installation. Start by disconnecting the negative terminal of your car battery to prevent short circuits or electrical damage. This step is non-negotiable—skipping it could lead to costly repairs or even a fire hazard.
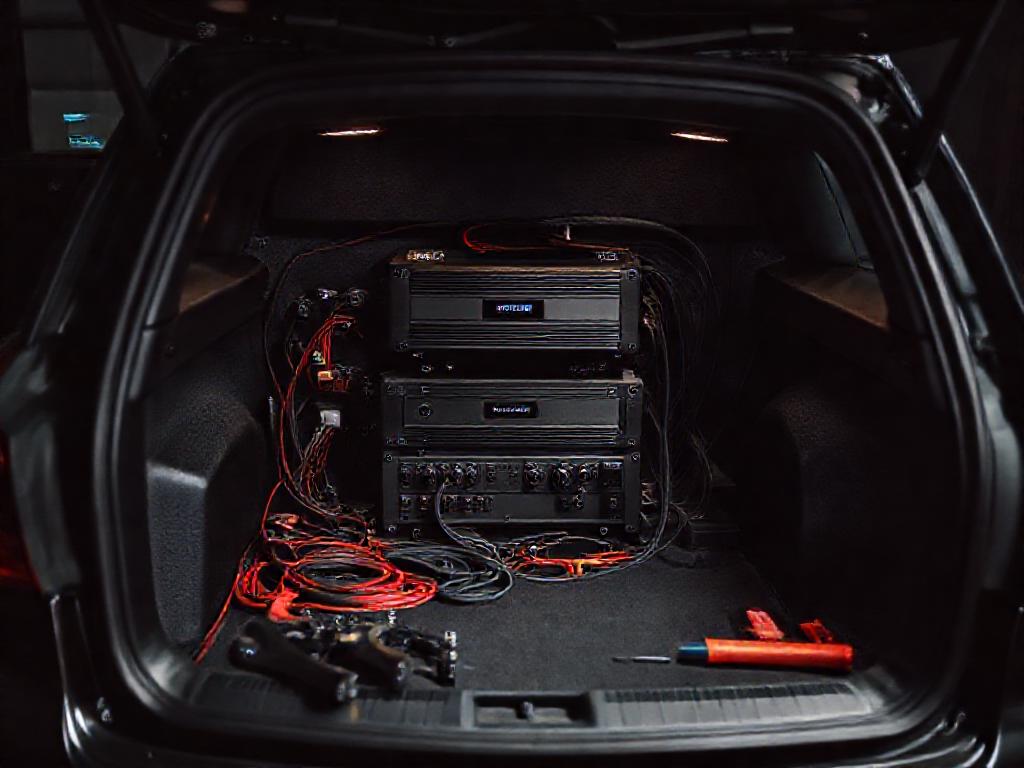
Next, plan your amplifier’s location. Common mounting spots include the trunk, under a seat, or against the rear firewall. Ensure the chosen area is well-ventilated, as amplifiers generate heat during operation. Avoid placing it near moving parts or areas prone to moisture, such as wheel wells.
Measure the space and verify that your amplifier will fit securely. If mounting in the trunk, consider using a dedicated amplifier rack or sound-deadening material to reduce vibrations. For under-seat installations, check for clearance when adjusting the seat position. Proper planning now will save you from redoing work later.
Step-by-Step Installation Process
Running the Power Cable
The power cable connects your amplifier to the car’s battery, providing the necessary current for operation. Start by routing the cable from the battery to the amplifier’s location, avoiding hot or moving engine components. Use existing grommets in the firewall to pass the cable into the cabin safely.
Near the battery, install a fuse holder within 18 inches of the positive terminal. The fuse rating should match your amplifier’s requirements—typically 60 to 150 amps for most setups. Secure the power cable with zip ties every 12 to 18 inches to prevent it from shifting or getting damaged.
Connecting the Ground Wire
A solid ground connection is critical for your amplifier’s performance and safety. Locate a bare metal surface near the amplifier, free of paint, rust, or debris. Use a sanding tool to clean the area, ensuring a direct metal-to-metal contact point.
Attach the ground wire to this spot using a self-tapping screw or bolt. The wire should be as short as possible—ideally under 18 inches—to minimize resistance. Secure the connection tightly to prevent vibrations from loosening it over time. A poor ground can cause noise, distortion, or even damage to your amplifier.
Wiring the RCA and Remote Turn-On Cables
RCA cables transmit the audio signal from your head unit to the amplifier. Route these cables along the opposite side of the vehicle from the power cable to avoid interference. If your head unit lacks RCA outputs, you may need a line output converter (LOC) to adapt speaker-level signals.
The remote turn-on wire tells the amplifier when to power on and off with your stereo. Connect this wire to the remote turn-on terminal on your head unit or an accessory wire in the harness. If your head unit doesn’t have a remote output, you can tap into the fuse box or use a relay for a switched 12V source.
Connecting the Speaker Wires
If your amplifier is powering speakers, connect the speaker wires from the amp’s output terminals to the corresponding speakers. Use the correct gauge wire for your setup—thicker wires (lower gauge) are needed for higher power levels. Secure connections with crimp connectors or solder for a reliable, long-lasting bond.
For subwoofer setups, connect the subwoofer’s voice coil(s) to the amplifier’s subwoofer output. Pay attention to impedance (ohm) ratings to avoid overloading the amplifier. If you’re unsure, consult your amplifier’s manual or a professional installer.
Testing and Troubleshooting
Before finalizing your installation, double-check all connections for security and proper polarity. Reconnect the car battery’s negative terminal, then turn on your stereo to test the amplifier. If everything is wired correctly, you should hear clear, distortion-free audio at all volume levels.
If you encounter issues, here are common troubleshooting steps:
- No power – Verify the fuse is intact and the ground connection is secure. Check the remote turn-on wire for continuity.
- Distorted sound – Ensure RCA cables are properly seated and not near power cables. Test for ground loops by temporarily disconnecting the ground wire.
- Amplifier overheating – Confirm the amplifier has adequate ventilation. Check for proper impedance matching with your speakers.
- Intermittent operation – Inspect all connections for loose or corroded terminals. Use a multimeter to test for voltage drops.
If problems persist, consult your amplifier’s manual or seek assistance from a professional installer. Safety should always be your top priority—never bypass fuses or ignore warning signs like burning smells or excessive heat.
Final Tips for a Professional Installation
A well-executed amplifier installation not only sounds great but also looks clean and professional. Use wire loom or split tubing to bundle cables together, reducing clutter and protecting them from abrasion. Secure all wires with zip ties to prevent them from rattling or getting caught in moving parts.
Consider adding sound-deadening material to your vehicle’s doors or trunk if you’re installing speakers or subwoofers. This reduces road noise and improves audio clarity, making your amplifier’s performance even more impressive. For those seeking premium components, Alchimist’s line of amplifiers and accessories offers German-engineered precision and reliability.
Finally, document your installation with photos or notes. This makes future upgrades or troubleshooting easier, especially if you plan to expand your system later. With patience and attention to detail, you’ll enjoy a powerful, high-fidelity audio experience every time you hit the road.
Need professional help? Contact our car audio experts for installation support. Looking for high-quality amplifiers? Check out our premium car amplifier collection.