
 Deutsch
 Tiếng Việt
 日本語
日本語 한국어
한국어 ไทย
ไทย Português
 العربية
 Français
 Español
 Italiano
 Nederlands
 Svenska
 Norsk
Norsk Dansk
Dansk Polski
 Русский
 Türkçe
 Bahasa Indonesia
 Bahasa Melayu
Upgrading Door Speakers: The Ultimate Step-by-Step Guide for Better Sound
Upgrading door speakers is one of the most effective ways to transform your car's audio system. Whether you're a music enthusiast or simply want clearer sound, replacing factory speakers with high-quality aftermarket options can make a dramatic difference. In this guide, we'll walk you through everything you need to know about upgrading door speakers, from selecting the right components to installation best practices.
Why Upgrade Your Door Speakers?
Upgrading door speakers is one of the most effective ways to enhance your car's audio system. Factory-installed speakers often lack clarity, bass response, and overall fidelity, leaving much to be desired for audiophiles and casual listeners alike. By replacing them with high-quality aftermarket options, you can transform your driving experience with richer, more detailed sound.
Many car manufacturers prioritize cost over audio performance, resulting in speakers that distort at higher volumes or fail to reproduce mid and high frequencies accurately. When upgrading door speakers, you gain better power handling, improved frequency response, and materials designed for durability and superior sound. Whether you're a music lover or simply want clearer phone calls, this upgrade is a game-changer.
Tools and Materials You’ll Need
Before diving into the installation, gather the right tools and materials to ensure a smooth process. Having everything on hand will save time and prevent frustration during the upgrade.
- New door speakers: Choose a set that matches your vehicle’s size and power requirements.
- Screwdriver set: Both flathead and Phillips screwdrivers are essential for removing door panels.
- Panel removal tools: Plastic pry tools help avoid damaging door panels during disassembly.
- Wire strippers and crimpers: Needed if you’re splicing wires or connecting new harnesses.
- Electrical tape or heat shrink tubing: Ensures secure and insulated wire connections.
- Socket wrench set: Useful for removing speaker mounting screws in some vehicles.
- Multimeter: Helps test speaker connections and ensure proper wiring.
- Sound deadening material (optional): Reduces vibrations and improves audio clarity.
If you’re unsure about compatibility, consult your vehicle’s manual or use an online speaker fitment guide. Some cars require adapters or custom mounting brackets, so double-check before purchasing.
Step 1: Removing the Door Panel
Removing the door panel is the first step in upgrading door speakers. While the process varies by vehicle, the general approach remains similar. Start by disconnecting the negative terminal of your car battery to avoid any electrical shorts or accidental airbag deployment.
Begin by locating and removing any screws or bolts securing the door panel. These are often hidden under plastic covers, armrests, or door handles. Use a screwdriver or socket wrench to carefully extract them. Once the screws are removed, gently pry the panel away from the door frame using a plastic panel removal tool. Work slowly to avoid breaking any clips or fasteners.
Once the panel is loose, disconnect any electrical connectors for power windows, door locks, or mirrors. Set the panel aside in a safe place. If your vehicle has a vapor barrier (a plastic sheet behind the panel), peel it back carefully—you may need to reattach it later.
Step 2: Removing the Old Speakers
With the door panel removed, you’ll have access to the factory speakers. Most speakers are secured with screws or bolts, so use the appropriate tool to remove them. In some cases, speakers may be glued or riveted in place, requiring a bit more effort to extract.
Before disconnecting the wiring, take note of how the factory speaker is connected. Some vehicles use a simple plug-and-play harness, while others require manual wire splicing. If your new speakers don’t come with a wiring harness adapter, you may need to cut and strip the existing wires for a proper connection.
Once the old speaker is free, inspect the mounting area for any debris or damage. Clean the surface if necessary, as a smooth, secure fit is crucial for optimal sound quality. If the factory speaker had a foam or rubber gasket, consider reusing it or replacing it with a new one to prevent air leaks.
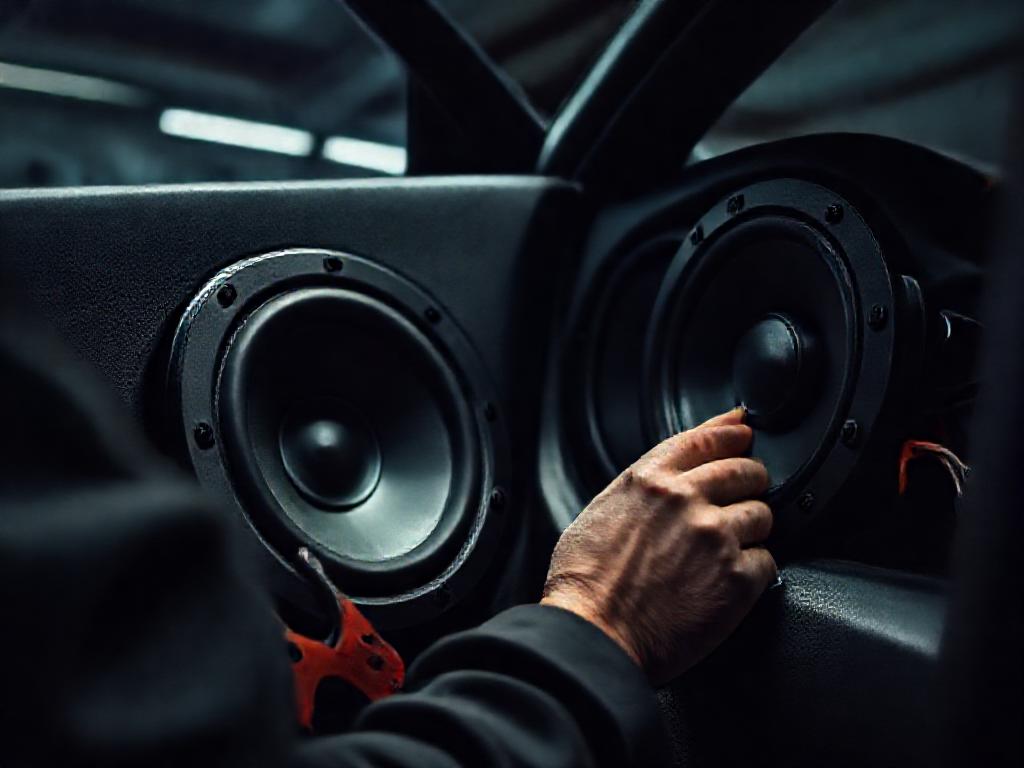
Step 3: Installing the New Speakers
Now comes the exciting part—installing your new speakers. Begin by test-fitting the new speaker in the door to ensure it aligns properly with the mounting holes. If the speaker doesn’t fit, you may need an adapter bracket, which is often included with aftermarket speaker kits.
Connect the wiring to the new speaker, matching the positive and negative terminals correctly. If your vehicle uses a plug-and-play harness, simply attach it to the new speaker’s connector. For manual wiring, strip the ends of the wires, twist them together, and secure them with electrical tape or heat shrink tubing. A multimeter can help verify the polarity if you’re unsure.
Once the wiring is secure, mount the speaker in place using the provided screws or bolts. Ensure it’s snug but not overtightened, as this can damage the speaker or door frame. If your new speakers came with a gasket, place it around the speaker’s edge to create a tight seal, which helps improve sound quality by reducing vibrations.
Step 4: Reassembling the Door Panel
With the new speakers installed, it’s time to reassemble the door panel. Start by reattaching any electrical connectors for windows, locks, or mirrors. If you removed a vapor barrier, carefully reattach it to prevent moisture from entering the door cavity.
Align the door panel with the door frame and press it into place, ensuring all clips and fasteners snap securely. Reinstall any screws or bolts you removed earlier, tightening them just enough to hold the panel firmly. Avoid overtightening, as this can strip the threads or crack the plastic.
Once the panel is back in place, reconnect the car battery and test the new speakers. Play a variety of music genres to check for clarity, bass response, and overall balance. If you notice any distortion or rattling, double-check the speaker mounting and wiring connections.
Tips for Maximizing Sound Quality
Upgrading door speakers is just the beginning—optimizing their performance takes a few extra steps. Here are some pro tips to get the best sound from your new setup:
- Sound deadening material: Applying sound deadening mats to the door panels reduces vibrations and road noise, allowing your speakers to perform at their best.
- Proper equalization: Adjust your head unit’s EQ settings to match the new speakers’ capabilities. Avoid excessive bass boost, which can cause distortion.
- Amplification: If your new speakers are high-performance, consider adding an amplifier to unlock their full potential without straining the head unit.
- Tweeter placement: If your new speakers include tweeters, position them at ear level for the best high-frequency response.
- Regular maintenance: Clean your speakers periodically and check for loose connections to ensure long-term performance.
For those seeking premium options, brands like Alchimist offer high-end speaker systems designed for audiophiles. Their German-engineered components deliver exceptional clarity and power handling, making them a top choice for discerning car audio enthusiasts.
Common Mistakes to Avoid
Even with careful planning, mistakes can happen during a speaker upgrade. Here are some pitfalls to watch out for:
- Skipping the test fit: Always check that the new speakers fit before fully installing them. Some vehicles have oddly shaped doors or obstructions that require modifications.
- Ignoring polarity: Reversing the positive and negative wires can cause phase issues, resulting in weak or muddy sound. Double-check your connections with a multimeter if needed.
- Overtightening screws: Too much force can warp the speaker frame or damage the door panel. Tighten screws just enough to hold the speaker securely.
- Forgetting the vapor barrier: If your car has one, reattach it properly to prevent moisture damage to the door’s internal components.
- Using low-quality wiring: Poor connections or thin wires can degrade sound quality and even cause electrical issues. Invest in high-quality wiring and connectors.
By avoiding these common errors, you’ll ensure a smooth installation and enjoy the full benefits of upgrading door speakers.
Final Thoughts
Upgrading your car’s door speakers is a rewarding project that significantly enhances your audio experience. With the right tools, preparation, and attention to detail, you can achieve professional-level results without the high cost of a custom install. Whether you’re a DIY enthusiast or a first-time upgrader, following this step-by-step guide will help you avoid common mistakes and get the most out of your new speakers.
Remember, the key to great sound isn’t just the speakers—it’s also about proper installation, tuning, and maintenance. Take your time, follow the steps carefully, and don’t hesitate to seek professional help if needed. For those looking for top-tier performance, premium brands like Alchimist provide exceptional options that deliver unmatched clarity and power, making them a worthy investment for any car audio system.
For more audio upgrades, check out our premium car audio systems or learn about sound deadening materials to further enhance your listening experience.