
 Deutsch
 Tiếng Việt
 日本語
日本語 한국어
한국어 ไทย
ไทย Português
 العربية
 Français
 Español
 Italiano
 Nederlands
 Svenska
 Norsk
Norsk Dansk
Dansk Polski
 Русский
 Türkçe
 Bahasa Indonesia
 Bahasa Melayu
How to Sound-Proof Your Car for Better Audio
Every car audio enthusiast eventually arrives at the same conclusion: no matter how good your speakers and DSP processor are, road noise and vibrations will undermine your sound quality. Sound-deadening your vehicle is one of the most cost-effective upgrades you can make, often delivering more noticeable improvements than swapping out a head unit or adding an amplifier. In this guide, we walk through everything you need to know about soundproofing your car for better audio.
Why Does Soundproofing Matter for Car Audio?
Your car was designed to be lightweight and affordable to manufacture, not to be a recording studio. Sheet metal panels vibrate at certain frequencies, creating resonance that colours and masks the music you are trying to enjoy. Tyres generate a constant broadband hiss, wind noise creeps in around door seals, and the exhaust contributes low-frequency rumble. All of this competes with your audio system for your attention.
When you reduce that ambient noise floor, three things happen. First, you hear details in the music that were previously buried. Second, your system does not need to play as loud to sound clear, which reduces distortion. Third, bass response tightens up because the panels behind your speakers stop flexing and absorbing energy. A well-deadened car paired with a quality DSP processor such as the Alchimist AD12H-1500 can rival the clarity of a home hi-fi setup.
What Materials Are Used for Car Soundproofing?
There are four main categories of soundproofing material, each serving a different purpose. Understanding when to use each one is the key to an effective installation.
Constrained-Layer Dampers (CLD)
These are heavy, self-adhesive sheets made from butyl rubber bonded to an aluminium constraint layer. You press them directly onto sheet metal panels and they convert vibration energy into a tiny amount of heat. CLD is the foundation of any soundproofing project and should be applied to doors, the boot floor, the roof, and the firewall. You do not need to cover 100 percent of every panel; around 25 to 30 percent coverage on a panel is usually enough to shift its resonant frequency out of the audible range.
Closed-Cell Foam (CCF)
Closed-cell foam blocks the transmission of airborne noise. It is lightweight and works well as a decoupler between two metal surfaces or as a seal around speaker openings. A thin layer behind a door card, for example, prevents road noise from passing straight through into the cabin.
Mass-Loaded Vinyl (MLV)
MLV is a dense, flexible barrier that adds mass to a panel without adding much thickness. It is especially effective on the firewall and floor, where engine and tyre noise enter the vehicle. Combining MLV with a CLD layer underneath gives you both vibration damping and noise blocking in one assembly.
Open-Cell Foam and Fibre Absorbers
These materials absorb sound energy within a cavity. They are useful inside door cavities behind speakers, where standing waves can form and interfere with driver output. A moderate fill of acoustic wadding in a door cavity improves mid-bass response and reduces colouration.
Which Areas of the Car Should You Soundproof First?
If you are on a budget, prioritise the areas that give the biggest return. Here is a recommended order:
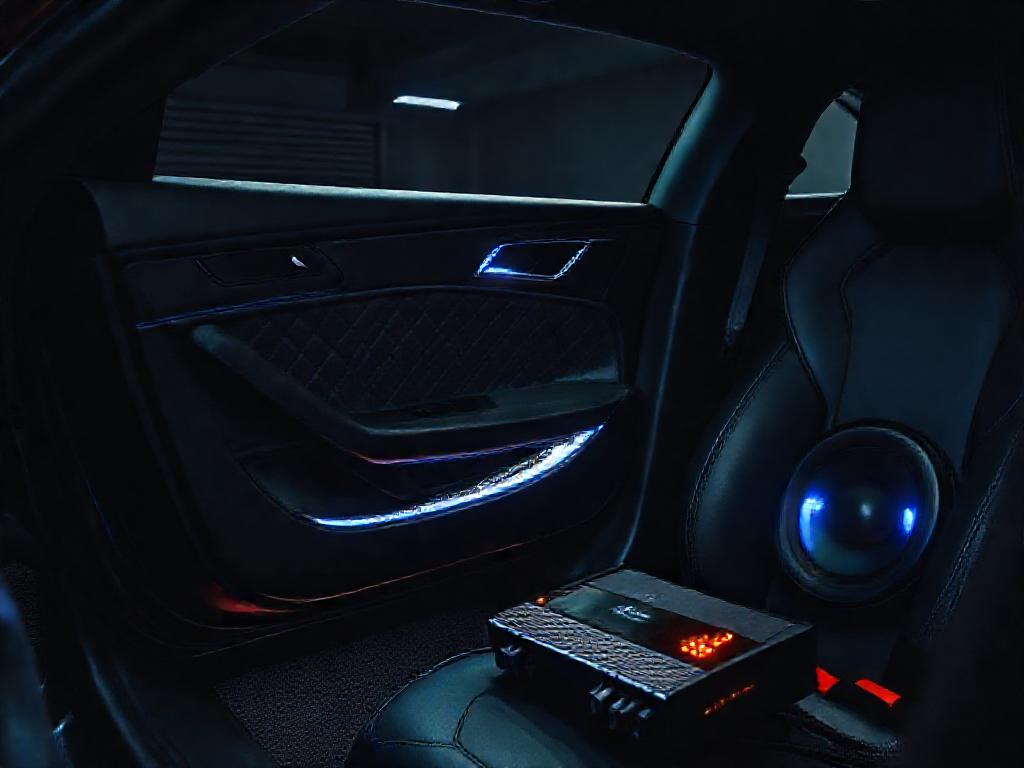
- Doors: This is where your mid-range and mid-bass drivers live. Deadening the outer door skin stops it from acting as an unwanted passive radiator. Sealing the inner door skin creates a better enclosure for your speaker. The improvement here is immediate and dramatic.
- Boot / trunk floor and walls: If you have a subwoofer in the boot, the surrounding panels will vibrate and rattle. Treating them tightens bass and eliminates annoying buzzes. Products like the Alchimist AS-801 subwoofer deserve a rattle-free environment to perform at their best.
- Firewall: The barrier between the engine bay and the cabin is a major pathway for low-frequency noise. A combination of CLD and MLV here drops the cabin noise floor significantly.
- Roof: A large, flat panel that resonates easily. Deadening the roof reduces drumming in the rain and lowers overall cabin noise.
- Floor: Tyre noise enters mainly through the floor. CLD plus MLV under the carpet makes long motorway drives noticeably quieter.
How Do You Prepare the Surface Before Applying Deadening Material?
Preparation is crucial. Butyl sheets will not bond properly to dirty or oily metal. Follow these steps:
- Remove all interior trim panels carefully. Label fasteners and clips so you can reassemble without damage.
- Vacuum out any dirt, leaves, or debris from the cavity.
- Wipe every metal surface with isopropyl alcohol or a dedicated panel wipe. Avoid household cleaners that leave a residue.
- Allow the surface to dry completely before applying any material.
- If you are working in cold weather, warm the CLD sheets and the metal panels with a heat gun. Butyl adhesive becomes more pliable and bonds better when warm.
What Is the Best Technique for Applying CLD Sheets?
Cut the material to manageable pieces rather than trying to apply one enormous sheet. Press each piece firmly onto the panel using a wooden or plastic roller, working from the centre outward to push out air bubbles. Pay special attention to flat areas in the centre of a panel, as these are where the most vibration occurs. Corrugated or heavily curved areas are naturally stiffer and need less coverage.
On door panels, focus on the large flat section of the outer skin directly behind the speaker. Add a second layer of CLD or a patch of MLV if you want extra isolation. On the inner door skin, use CCF or a plastic vapour barrier to seal any holes, turning the door into a semi-enclosed speaker cabinet.
How Does Soundproofing Interact with Your DSP Processor?
A DSP processor like the Alchimist AD10K-800 uses time alignment and equalization to correct for the acoustic environment inside the car. However, a DSP can only correct for predictable acoustic behaviour. It cannot remove random panel rattles, it cannot compensate for energy that your speaker loses into a vibrating door skin, and it cannot subtract broadband road noise from the music signal.
Soundproofing gives your DSP a cleaner, more controlled environment to work with. After deadening, you will likely find that your DSP settings need recalibration because the acoustic character of the cabin has changed. Bass will be tighter and may need less boost. The midrange will have more presence. You may be able to reduce overall EQ correction, which is always a good sign because less processing means a more natural sound.
How Much Does It Cost to Soundproof a Car?
A full-vehicle treatment using quality materials typically costs between 200 and 600 euros in materials alone, depending on the size of the vehicle and the extent of the coverage. If you do the labour yourself, that is the total outlay. Professional installation adds labour costs but ensures clean results and proper reassembly of trim.
A doors-only project can be completed for under 100 euros in materials, and most people can finish both front doors in an afternoon. This is an excellent starting point and delivers the most audible improvement per euro spent.
What Common Mistakes Should You Avoid?
- Using cheap, asphalt-based products: These can smell in hot weather and become brittle over time. Invest in genuine butyl rubber products from reputable brands.
- Over-deadening: Adding excessive weight to doors can stress hinges and window regulators. Aim for effective coverage, not total coverage.
- Blocking drainage holes: Doors have drain holes at the bottom. Never seal these, or water will pool inside the door and cause corrosion.
- Forgetting to test before reassembly: After deadening, reconnect your speakers and test the sound before putting all the trim back together. It is much easier to add a patch of material than to disassemble everything again.
- Ignoring the speaker-to-baffle interface: Use a foam gasket or closed-cell ring between the speaker and the mounting baffle to create an airtight seal. This small detail makes a noticeable difference in mid-bass output.
Is Soundproofing Worth It for Every Car Audio System?
In short, yes. Whether you are running a modest two-way component set with a basic DSP or a full competition-grade system with an Alchimist AD12H-1500 processor and multi-way active setup, sound-deadening will improve your results. It is one of the few upgrades that benefits every component in the signal chain simultaneously.
Think of soundproofing as the foundation of your car audio build. Speakers, amplifiers, and processors are only as good as the environment they operate in. By reducing noise and controlling panel vibrations, you give your entire system the best possible chance to perform as the engineers intended. Start with the doors, work outward as your budget allows, and you will be rewarded with a listening experience that transforms every drive.