
 Deutsch
 Tiếng Việt
 日本語
日本語 한국어
한국어 ไทย
ไทย Português
 العربية
 Français
 Español
 Italiano
 Nederlands
 Svenska
 Norsk
Norsk Dansk
Dansk Polski
 Русский
 Türkçe
 Bahasa Indonesia
 Bahasa Melayu
Complete Car Audio Upgrade Guide for Beginners
Upgrading your car audio system can feel overwhelming when you are just getting started. The market is flooded with products, specifications, and conflicting advice. Should you start with speakers or an amplifier? Is a subwoofer necessary? What exactly does a DSP processor do, and do you need one? This guide answers all of these questions and lays out a clear, logical upgrade path that will take you from a stock system to something genuinely impressive.
Whether your budget is modest or generous, the principles remain the same. We will walk through each component of a car audio system, explain what it does, and tell you the optimal order to upgrade for maximum impact at every stage.
What Makes Factory Car Audio Systems Sound Bad?
Before diving into upgrades, it helps to understand why factory audio systems are almost universally disappointing. The answer comes down to cost engineering and compromise.
Vehicle manufacturers allocate a tiny fraction of the car's total cost to the audio system. In a standard trim vehicle, the entire audio system including head unit, speakers, and wiring might represent less than one percent of the vehicle's price. This forces compromises at every level.
- Paper cone speakers with lightweight magnets that cannot produce deep bass or crisp highs
- Low-power head units that clip and distort at moderate volumes
- Thin, resonant door panels that rattle and absorb bass energy instead of letting it reach your ears
- No sound deadening on the doors, floor, or trunk, allowing road noise to compete with the music
- Poor speaker locations with tweeters hidden behind grilles or placed at ankle level
The good news is that every one of these weaknesses can be addressed with aftermarket upgrades, and you do not need to do everything at once.
What Is the Best Order to Upgrade Your Car Audio?
This is the most important question for beginners, and the answer might surprise you. Many people assume they should start with the biggest, loudest component, but the most effective upgrade path follows a specific sequence.
Step 1: Sound Deadening
Before you install a single new component, apply sound deadening material to the front doors. This is the highest-impact, lowest-cost upgrade you can make. Sound deadening material, such as butyl rubber sheets, adheres to the inner door skin and reduces vibration, rattling, and resonance.
When a speaker plays bass notes, the rear wave from the cone pressurizes the air behind it inside the door cavity. Without deadening, this energy causes the thin sheet metal to flex and vibrate, absorbing bass energy and creating distortion. A properly deadened door acts like a solid speaker enclosure, allowing the driver to produce cleaner, deeper bass with better efficiency.
At minimum, apply deadening material to the outer door skin directly behind the speaker. For more thorough results, treat the inner door skin and any large, flat metal surfaces that vibrate when you tap them.
Step 2: Front Speakers
Your front speakers are the foundation of your system. They carry the majority of the musical content you hear, including vocals, guitars, drums, and everything in between. Upgrading from factory paper speakers to quality aftermarket drivers produces an immediately noticeable improvement in clarity, detail, and overall tonal balance.
For beginners, a quality coaxial speaker is the simplest upgrade path. The Alchimist AS-G65 coaxial speaker drops into most factory 6.5-inch locations and delivers dramatically better performance than any stock speaker. If you are ready for more advanced performance, the Alchimist AS-G65C component set separates the tweeter from the woofer, allowing you to mount the tweeter higher on the dash or A-pillar for vastly improved imaging.
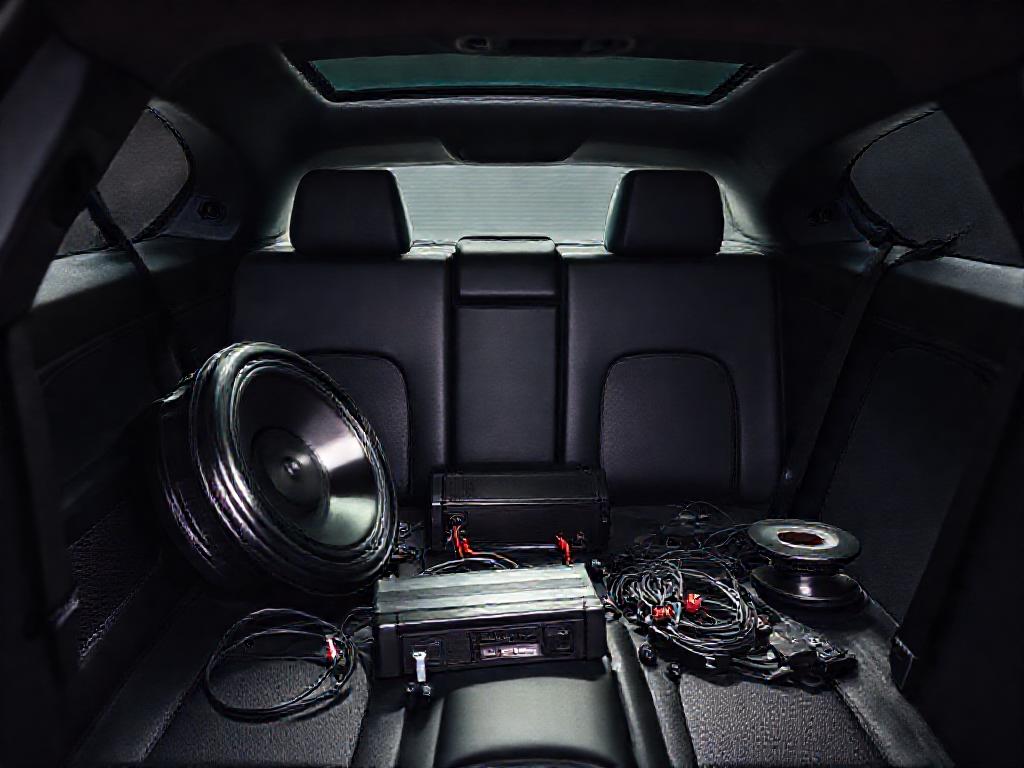
Step 3: Amplifier
Your factory head unit produces around 15 to 25 watts per channel of real power, often with significant distortion at higher volumes. Adding a dedicated amplifier provides several key benefits:
- Clean power: An aftermarket amplifier produces a much cleaner signal with lower distortion than a head unit, even at low volumes.
- Headroom: With 50 to 100 watts per channel, you can play music at any volume without the amplifier straining or clipping.
- Control: Dedicated amplification gives you precise gain control and lets your speakers operate within their designed performance envelope.
A four-channel amplifier is the most versatile first amplifier purchase. It can power your front and rear speakers, or you can bridge two channels to drive a small subwoofer while the remaining channels power the front speakers.
Step 4: DSP Processor
A digital signal processor is the brain of a modern car audio system. It sits between the source (head unit) and the amplifiers, providing precise control over every aspect of the audio signal. A DSP allows you to:
- Set crossover frequencies to send the right frequencies to the right speakers
- Apply time alignment to correct for the different distances between each speaker and your ears
- Equalize the response to compensate for cabin acoustics and speaker placement
- Adjust levels for each individual driver to create a balanced, coherent sound
While a DSP is not strictly necessary for a basic upgrade, it transforms a good system into a great one. Many enthusiasts who install a DSP for the first time describe the experience as hearing their system for the first time, because the time alignment and equalization correct issues they did not even know existed.
Step 5: Subwoofer
Adding a subwoofer extends your system's bass response below what door-mounted speakers can produce. Even a modest subwoofer like the Alchimist AS-801 in a properly sized sealed enclosure will fill in the low-frequency foundation that makes music feel complete and dynamic.
A common misconception among beginners is that a subwoofer is only for bass-heavy music or for people who want to rattle their mirrors. In reality, a well-integrated subwoofer improves every genre of music by reproducing the lowest octaves that give recordings their weight and realism. A jazz upright bass, a classical timpani, the body of an acoustic guitar: all of these benefit from proper low-frequency reproduction.
Step 6: Rear Fill (Optional)
Rear speakers are genuinely optional in a well-built system. A strong front stage with proper imaging and a subwoofer for low-frequency support provides a complete listening experience. However, if you prefer some rear ambience, upgrading the rear speakers to quality coaxials and keeping them at a low level relative to the fronts adds a pleasant sense of envelopment.
How Much Should You Budget for a Car Audio Upgrade?
Car audio upgrades scale well across different budgets. Here are rough tiers to help you plan.
Entry Level: Better Than Stock
A set of quality coaxial speakers for the front, basic sound deadening on the front doors, and proper installation hardware. This level provides an immediately noticeable improvement over factory equipment and serves as a foundation for future upgrades.
Mid Level: Seriously Good
Component speakers in the front, a four-channel amplifier, sound deadening on all four doors, a compact subwoofer in a sealed enclosure, and a basic DSP processor. This is where the system starts to become genuinely impressive, with clear imaging, solid bass, and clean power at any volume.
Advanced Level: Competition Quality
A full component front stage with A-pillar tweeter mounting, a high-quality DSP processor with advanced tuning, dedicated subwoofer amplifier, premium subwoofer, comprehensive sound deadening throughout the vehicle, and professional tuning. At this level, the system competes with high-end home audio and can hold its own in competition events.
What Tools Do You Need for a Basic Installation?
If you plan to do some or all of the installation yourself, here are the essential tools:
- Trim removal tools: Plastic pry tools designed to remove door panels and interior trim without damage
- Wire strippers and crimpers: For making clean electrical connections
- Soldering iron: For permanent speaker and power wire connections
- Multimeter: For testing voltages, continuity, and polarity
- Drill with assorted bits: For mounting hardware and routing wires
- Heat shrink tubing: For insulating soldered connections
- Cable ties and loom: For organizing and protecting wire runs
- Panel clip assortment: To replace any clips that break during trim removal
What Common Beginner Mistakes Should You Avoid?
Learning from other people's mistakes can save you time, money, and frustration. Here are the most common pitfalls for first-time upgraders.
- Buying based on peak watt ratings. Peak power is a marketing number. Always compare RMS (continuous) power ratings when evaluating speakers and amplifiers.
- Skipping sound deadening. Installing expensive speakers in untreated doors wastes a significant portion of their potential. Budget for deadening material from the start.
- Setting amplifier gains by ear. Use an oscilloscope, a distortion detector, or at minimum, the manufacturer's gain-setting procedure. Incorrect gain is the most common cause of speaker damage in aftermarket systems.
- Ignoring the electrical system. Amplifiers draw significant current. Use the correct gauge power wire, install a proper fuse near the battery, and ensure your vehicle's charging system can support the added load.
- Upgrading everything at once. Following the sequential approach outlined above lets you appreciate each improvement individually and ensures you are not masking a problem in one area with a change in another.
- Neglecting proper wiring. Quality speaker wire, RCA cables, and power wiring are not glamorous, but they are the circulatory system of your audio setup. Use appropriate gauges, make solid connections, and route signal cables away from power cables to avoid noise.
Should You Install It Yourself or Hire a Professional?
Many car audio upgrades are within the reach of a capable DIY enthusiast, but some tasks benefit from professional expertise.
Good DIY projects:
- Speaker replacement in factory locations (coaxial swaps)
- Sound deadening application
- Basic amplifier installation with pre-made wiring kits
- Subwoofer installation using a pre-built enclosure
Consider professional installation for:
- Component speaker systems requiring custom tweeter mounting
- A-pillar pod fabrication
- DSP tuning and time alignment calibration
- Complex wiring in vehicles with advanced factory electronics
- Any work near airbag components
Getting Started: Your First Upgrade
If you are reading this guide and feeling ready to take the first step, here is a simple action plan. Start with sound deadening on your front doors and a quality speaker upgrade. The combination of a treated door and an aftermarket speaker like the Alchimist AS-G65 or AS-G65C will produce a transformation that makes you wonder why you waited so long.
From there, each subsequent upgrade builds on the last. Add amplification when you want more power and clarity. Add a DSP when you are ready to fine-tune the presentation. Add a subwoofer when you want the low-frequency foundation that completes the picture. There is no wrong time to start and no single right way to build a system; what matters is making deliberate, informed choices at each step.
Visit our products page to explore the Alchimist range of speakers, subwoofers, and DSP processors, each designed to deliver professional-grade audio performance for your vehicle.